Monthly Archives: April 2015

Raspberry Pi Compatible Multicore Development Board

If you are looking for a low-cost development platform for adding to your low-cost, versatile, credit-card sized, single board computer, the Raspberry Pi or RBPi, a startKIT might be just what you need. With a startKIT attached to your RBPi, you can have real-time Input/Outputs and several communication features including networking and audio, making it an ideal platform for varied applications such as digital audio, networking, motion control and robotics.

This ultra-low-cost development platform for the RBPi is made by XMOS, featuring the configurable multicore micro-controller technology – xCORE. These are an innovative family of devices that you can configure with software for a wide variety of interface and peripheral blocks. Equipped with header connections, startKIT can easily be interfaced to RBPi products. That makes it the ideal real-time IO solution for projects involving the RBPi.

XMOS provides free-to-use design tools along with the startKIT. These xTIMEcomposer design tools offer developers the right interface configurations, allowing them to write application codes quickly, using C/C++, all within a single programming environment. Developers get a full graphical development with the xTIMEcomposer, which includes a compiler, a static time analyzer, a software-based logic analysis tool and a debugger.

The entire board of the startKIT measures just 94x50mm. The kit is based around the xCORE-Analog multicore micro-controller, the XS1-A8-64-DEV. The xCORE runs at 500MIPS and has eight numbers of 32-bit logical processing cores. Along with the multicore micro-controller, the startKIT comes with an array of LEDs, 2 capacitive sense sliders, a push-button switch and a sliceCARD connector. The sliceCARD connector is compatible with several IO slices that XMOS makes available. You can connect the startKIT board to a breadboard system, as it is equipped with suitable header connectors.

For new users to start with the startKIT, XMOS provides several wide-ranging example codes. These include a web-server application, a software-defined Ethernet interface and the basic driver software necessary for operating the on-board LEDs and the push-button. If you want more, you are free to join the XCORE Exchange, a thriving community of users at xCORE; you will have access to a large variety of xCORE code.

The on-chip debug capabilities of the on-board xCORE multicore micro-controller, XS1-A8-64-DEV, allows the developer an in-circuit analysis of the complete design in comprehensive real-time. That makes it easy to see what is happening in real-time at the device interface and in the code – while the system is running – all without affecting the performance. You can also monitor the analog interfaces alongside the digital signals of the startKIT. For example, you can monitor the signals on the capacitive touch-sensors in real-time.

For those who work with applications such as digital audio, networking, motion control and robotics, the eight 32-bit logical cores of the 500MIPS xCORE multicore micro-controller can perform deterministically. Therefore, you can configure the startKIT to match your exact requirements as the software allows you to configure the interface.

The xCORE-Analog A8-DEV is a two-tile device. While Tile-0 handles the integrated debugger and USB PHY, Tile-1 is dedicated to the user-programmable eight logical cores, with its digital IO available on pins. That allows several types of peripherals to be integrated with the startKIT board.

New Method for Recycling PCB Waste

All over the world, gadgets contain Printed Circuit Boards or PCBs as a means of mounting and interconnecting the several electronic components they use. When the life of the gadget comes to an end, nearly all components are recycled. Although the recycling process is streamlined in some countries, it is still a growing industry in most developing countries. It is especially difficult to recycle the PCB and its components, since it often produced significant waste streams. Researchers in China have developed an innovative method to salvage the materials found in waste PCBs.

Every year, e-waste produced around the globe reaches nearly 50-million tons, most of which ends up in the developing countries such as China and India. Now, there is a friendly method for salvaging materials from waste PCBs. Using the solvent Dimethyl Sulfoxide or DMSO, Chinese researchers claim to have developed an environmentally friendly method that can simplify the process of recycling e-waste, especially waste PCBs.

Traditional methods of recovering precious metals from waste PCBs include using pyrolysis along with hydrometallurgical processes. The process uses aqueous solvents such as strong alkalis and acids. However, these processes are not environmentally friendly. They contaminate the environment with toxic heavy metals including persistent organic pollutants. They also generate a huge quantity of spend acids and alkalis that is difficult or impossible to recover.

At the Zhejiang Gongshang University in Hangzhou, researchers Ping Zhu and colleagues have developed a simple process of separation. They claim this process can recover valuable materials from waste PCBs at much lower recycling costs. At the same time, their method does not create the environmental pollution that other methods do.

Traditional methods decompose the polymer resins of waste PCBs to separate them. This process generates polybrominated dibenzofurans and deibenzodioxins, which are highly toxic. The new method is simple and easy as it swells the polymer resins, but does not allow it to decompose into the solution. Therefore, the process does not cause secondary pollution and the solvent can be reused.

According to the team, the process begins with stripping the waste PCBs of all electronic components. Next, the bare boards are shredded into fragments of approximately 1-3cm2. Then, the fragments are heated with DMSO – under an atmosphere of nitrogen. As the DMSO swells the brominated epoxy resin that holds the PCB layers together, they separate from one another. After abstracting and filtering the solution, it is evaporated under vacuum to regenerate the used DMSO. That leaves behind the separated polymer resin and the circuit board components.

At present, the size of the PCB fragments can be an issue in scaling the process up to industrial scales. At Ecyclex, an e-waste management company in the UAE, Saeed Nusri, a chemical engineer feels that this process could be remarkable. In his opinion, the process can solve many issues related to process complexity and solvent recovery that are typically faced in hydrometallurgical recycling of PCBs. Since only 2% of DMSO is lost in every run, there is a lot of savings in raw materials.

Raspberry Pi Gesture Control

Many smartphones are capable of gesture control, where the phone can sense movement of the owner’s hands near it and respond accordingly. Now you can add the same features to the versatile credit card sized single board computer, the Raspberry Pi or RBPi. The features are provided by the Microchip 3D Gesture Controller, the MGC3130 GestIC and a 3D Touchpad.

The hardware you will need for implementing the gesture control is the MGC3130 Hillstar Development Kit, a 5V, 1.2A power supply with a microUSB connector and an RBPi Model B, preferably V2. Initially, you will need access to a PC for parameterization and for flashing the firmware on the MGC3130. After the flashing is over, the MGC3130 can communicate directly with the RBPi via the GesturePort available of the tiny MGC3130 board on the Hillstar dev kit. The Hillstar board needs signals EIO1, EIO2, EIO3, EIO6 and EIO7, which the RBPi supplies via its GPIO connector.

3D gesture sensing and control applications require capacitive sensing, which the MGC3130 handles aptly. You can either power the Hillstar board from the USB charger, or let the RBPi power it up directly. Once connected, the MGC3130 senses the North-South and East-West hand flicks. The EIOx pins flag the gestures sensed to the RBPi, which then acts on them according to actions already assigned.

The GestIC controller has Aurea, a free graphic shell working around it. Aurea allows parameterization of several planes of different sizes and configuration. These planes make up the capacitive sensing pad and you can calibrate and configure them with good precision. For programming, you will require the Raspbian OS Debian Wheezy – version January 2014, Python – version 2.7.3, RPI.GPIO – version 0.5.4, Tkinter and Leafpad. All the above software are already included in the Raspbian OS. To demonstrate the functioning of the gesture controller, you can use the python code for the game “2048” – 2048_with_Gesture_Port_Demo.py.

The software package for the MGC3130 contains all the relevant system software and its documentation. The package, provided by Microchip, contains the PC software Aurea, the GestIC Library binary file, the GestIC Parameterization files, CDC driver for Windows and the relevant documentation. You can use the Software Development Kit, also from Microchip, for integrating the MGC3130 into a software environment, as it includes a C-reference code for the GestIC API, a precompiled library for the Windows operating system. It also includes a demo application (the game “2048”) that uses the GestIC API interface on the Hillside Development Kit.

The Hillstar Development Kit provides a reference electrode of 95×60 cm for the touchpad. This consists of one Transmit and a set of five Receive electrodes – one each for north, east, south, west and center positions. These electrodes are placed in two different layers. To shield the Transmit electrode from external influences, it has a ground layer just underneath.

The five Receive electrodes include the four frame electrodes and one center electrode. The frame electrode names follow from their cardinal directions, that is, north, east, south and west. The maximum sensing area is defined by the dimensions of the four Receive frame electrodes. The center electrode is positioned to get a similar input signal level as received by the four frame electrodes.

How Good Are Hydrostatic Drives?

Wherever a means of power transmission and variable speed are required, we typically think of using mechanical and electrical variable-speed drives and gear-type transmissions. However, there exists another equally excellent means of transmitting power, and that is through hydrostatic drives. While offering a fast response, hydraulic drives can maintain precise speed under varying loads all the while allowing infinitely variable speed control from zero to maximum.

Gear transmission systems usually have a discontinuous power curve with peaks and valleys. For increasing available torque, you need to shift gears. Hydraulic drives can overcome both these shortcomings. However, despite their superior performance, hydrostatics have a major drawback – higher cost compared to their mechanical counterparts.

However, manufacturers are driving down the economics of using hydrostatic drives. They are producing smaller and lighter packages, while boosting performance levels and offering advanced electronic controls. Many applications now prefer to use hydrostatics to other types of drives.

Hydrostatic drives have several advantages, the most significant being – a basic hydrostatic transmission is an entire hydraulic system. The simple package contains all the required controls, the motor and the pump included. The single unit provides all the advantages of a conventional hydraulic system – ability to be installed without damage; easy controllability; an entirely stepless adjustment of speed, torque and power; with smooth and controllable acceleration. All this comes with the simple convenience of a single-package procurement and installation.

Earlier, hydrostatic transmissions were limited to low-cost applications such as garden tractors and farm equipment. However, with improved designs, especially in control systems, hydrostatic transmissions are now suitable for a wide variety of applications.

This has resulted in the use of light-duty units of less than 20HP being used on equipment such as small machine tools, maintenance equipment for golf courses and lawn tractors. Medium-duty units of 25-50HP are used on vehicles such as harvesters, trenchers and steer loaders. Agricultural and large constructional equipment mostly use the heavy -duty transmission equipment rated for 60HP and above.

The increasing attractiveness of hydrostatic transmission is partly due to the improved design of motors and pumps that result in higher flow and pressure ratings in more compact packages. For example, where earlier pumps could deliver only 0.125-gpm flow for every pound of pump, current pumps can deliver more than 0.5gpm/lb., representing a four-fold increase. Similarly, where older motors could provide only about 0.5HP/lb., newer motors offer 2.5HP/lb. with ease.

Today, you can have hydrostatic transmissions with at least three standards of output performance – Variable-power/Variable-torque, Variable-power/Constant-torque and Constant-power/Variable-torque. Additionally, you can select hydrostatic drive configurations such as close-coupled or split-coupled. The transmission size is specified by corner horsepower of the work function. You obtain corner horsepower by multiplying the maximum force required with the maximum speed requirement, although you may never require these two conditions simultaneously.

Earlier control capabilities of hydrostatic transmissions were limited to simple remote electrical actuators. Today, they have advanced to packages offering complete optimization of the machine performance.

Fuel savings and increased productivity make hydrostatic proportional controls economical to use in most traction drives and propel systems, although they may not be economical for every application.

What are Leadless Packages?

Electronic components, especially semiconductors have undergone a dramatic transformation over the past few decades. Starting from the through-hole packages, semiconductors evolved into the surface mount packaging, which is the default today. With the increase in packaging density, surface mount packaging is now limited to passive components mostly, while semiconductors are moving towards current technologies involving leadless packaging.

Modern technologies involve leadless packaging such as dual/quad flats with no leads (DFN/QFN), Ball Grid Arrays or BGAs and Chip Scale Packaging or CSP. Such innovative technologies are allowing the semiconductor industry to exploit the successive IC processing shrink and achieve product performances, which were thought impossible earlier

For example, consider a simple three-pin discrete device such as a MOSFET, typically used as a switching device that can conduct currents ranging from 0.1A to more than 100A at voltages surpassing 1000V. Applications as diverse as motor controls to battery management use MOSFETs.

Leadless packaging makes discrete devices more attractive because of the assembly efficiencies involved that makes them friendlier to the environment. Although several leadless solutions are possible for packaging MOSFETs – BGAs, CSPs and DFN/QFN – the governing factor here is mainly the market price pressure. Substrate costs may be expensive, making package material sets undesirable for BGA packaging. Moreover, capital expenditure required to changeover to full production with new packaging types such as BGAs and CSPs may increase the per-unit cost.

Consequently, BGA and CSP packaging is limited to discrete semiconductor applications where the average selling price is of a secondary consideration over more important parameters such as performance. At present, the traditional surface mount packages are being replaced by the more cost-effective alternatives leadless package solutions such as the DFN and QFN.

The manufacturing steps for a typical DFN package consists of six key processes. A silicon die is attached to a copper alloy or similar leadframe using a highly conductive epoxy resin. The package pads are then attached to the silicon die using wirebonds of aluminum or gold. The silicon and leadframe package is then hermetically sealed with a mold of a halogen-free compound. Sawing the molded lead frame yields the finished package product.

Leadless packages offer several advantages. They utilize the available board-space more efficiently, while improving the thermal performance of the device. For example, the SOT23 package, being one of the most widely used packages of the semiconductor industry, has a silicon-to-footprint ratio of 23%, while it occupies 8mm2 space on the printed circuit board. Comparatively, The DFN2020 package has a silicon-to-footprint ratio of 42%, which is nearly double that of the SOT23, while it occupies only 4mm2 space on the PCB. This leads to huge cost benefits to the manufacturing industry, while simultaneously increasing the electrical performance of the application.

The DFN package has a highly conductive copper alloy pad for the die, which is exposed to the outside of the package to be soldered. This larger area of contact between the DFN package and the printed circuit board results in a very low thermal impedance between the junction and the leads. This ensures not only a reliable contact, but also a higher thermal efficiency as compared to typical surface mount packages.

LED Indicator for the Raspberry Pi

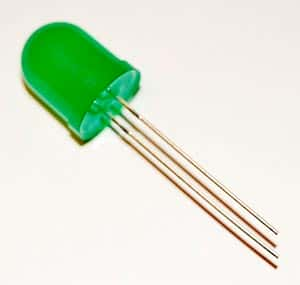
Some projects are attempted not because they have any ulterior value, but simply because they are fun to do and involve learning for the uninitiated. The Raspberry Pi or RBPi is a low-cost, compact single board computer platform that came into being for the sole purpose of teaching youngsters how to program computers. However, its popularity has grown beyond its primary mandate. Making an indicator light come up for notifications is a simple fun project, which shows how to set up notifications and how to hook up an LED module to an RBPi.

To start with, for this project you will need a functional RBPi unit with Raspbian installed on it. In case you are new to RBPi, you can catch up with this tutorial on how to get started – it is essential that you have the basics covered before getting on. In addition to the RBPi unit, you will also need an LEDBorg module, available from PiBorg and a clear or frosted case for your RBPi. The clear/frosted case for the RBPi is not an essential item, but it conveniently hides the RBPi card and the LEDBorg module, while allowing the LED light to shine through – this offers protection as well as makes the project look neater.

Strictly speaking, even the LEDBorg is not an essential item to use. You could connect a series resistance to an LED and use the combination instead. Using the LEDBorg only makes it easier for the project as it provides a compact unit that is designed to fit directly on the GPIO pins of your RBPi. If your RBPi is turned on, power it down, open the case and orient the LEDBorg module correctly before plugging it in.

While orienting the LEDBorg module, make sure the logo on the board comes closest to the RCA connector on the RBPi board, while the edge of the LEDBorg is flush with the RBPi board edge. While the case is open, take care to cover the indicator LEDs on the RBPi with opaque tape so as not to confuse the LEDBorg LED with the RBPI power and network indicator LEDs. Once the LEDBorg is plugged in and the extra LEDs are covered, you can close the case and power up the RBPi to move onto the next phase of the project.

Depending on whether your RBPi is a revision 1 or a revision 2, and the kernel version in use, you will have to download the specific software package for the LEDBorg from the PiBorg website. Now open up a terminal on the RBPi to download and install the package. This will give you the GUI wrapper for driving the LEDBorg through your RBPi. To check if the module is functional, pick any color in the demo mode of the software and test it. The only thing that remains now is to use scripts to change our LED into an actual indicator based on notifications.

For example, you may want to turn on the LED if there is rain forecasted in the weather report. Follow this tutorial to link up your LED with the weather forecast. The same tutorial will also tell you how to light up the LED if you have received mail in your Gmail account.

Expect These Smartphone Innovations In The Near Future

Things are moving very rapidly in the smartphone arena. The phone you buy today after so many considerations and searches on the web, loses its new shine the very next day – some other phone has better features at a lower price. Just as for desktops, new processors for smartphones are entering the market with ever-increasing number of cores inside them. Memory prices are falling, so 2GB RAM is now a norm rather than a feature.

Today’s top-of-the-line smartphones are powered by processors from MediaTek, Qualcomm, NVidia or Samsung – leaving aside the iPhones. The processor is the veritable backbone of a smartphone, coupled with a GPU, which handles the graphics. Computational capabilities of a powerful processor such as the Snapdragon 805, from Qualcomm, offers enhanced abilities such as the virtual reality environment on Samsung’s Galaxy Note 4.

If you thought that virtual reality was the last frontier to be reached, well, just wait for the Snapdragon 810 as this is expected to take things even further up. Qualcomm has already demonstrated some of the new features that it will bring into smartphones this new year.

Although some smartphones already have Quad HD displays of 2560 x 1440 resolution, the new Snapdragon 810 will allow wireless streaming of 4K video to a TV with just a few taps. If your TV is capable of displaying the 4096 x 2160 resolution, the new phone will be capable of moving 4K video to your TV. The problem is that there are not enough sources for 4K videos at present.

However, Qualcomm has an answer for that as well. Most smartphones with 8MP cameras are already capable of shooting 4K videos. Qualcomm estimates that by 2018, there will be over 500 million devices with 4K-capability. The new Snapdragon 810 chip is going to make the smartphone even smarter. It will let the tiny camera on the smartphone simulate the zoom power that only a DSLR camera lens enjoys right now.

Core Photonics is making a new type of camera with the combined capabilities of a wide-angle as well as a fixed telephoto lens that can magnify the image by a factor of three. The advanced computing power of Snapdragon 810 can combine the two images and create a better picture than what a DSLR camera can produce at low zoom levels.

For example, in a practical demonstration by Core Photonics, a normal DSLR camera aimed at a peanut cartoon produced only a blurred image with illegible text. However, with the new camera, not only was the cartoon crisply displayed, the text was also readable, although it was set to only 8x zoom.

Smartphones can record video, but they cannot select the audio from an individual. The Qualcomm processor will have directional audio capabilities, allowing the user to record an individual voice selectively in a room full of loud sounds. Therefore, when you are filming a single person, you can instruct your phone to pick up only his or her voice and nothing else.

Such a powerful processor as the Qualcomm Snapdragon 810 will make a tablet as powerful as a PC is today, when supplemented with a monitor, keyboard and mouse – all connected without wires.

An Introduction to the Raspberry Pi GPIO

gpioThe highly popular, tiny, single board computer, the Raspberry Pi or RBPi has a row of pins along one of its board edges close to the yellow video out socket. These are its general purpose input/output or GPIO pins and one of its very powerful features.

The RBPi needs these pins to interact with the outside world physically. To simplify things, you can think of them as switches that you can control as inputs or that the RBPi can control as outputs. Of the 26 pins available, nine are for power and ground, while the rest of them (seventeen) are the GPIO pins.

You can set up these pins in different ways to interact with the real world and do fantastic things. It is not strictly necessary that the inputs come only from a physical switch. It might be the input from a sensor, a device or even a signal from another computer, for example. You can use the outputs for anything from turning on an LED to sending data or a signal to another device.

For example, if your RBPi is on a network, you can remotely control devices that are attached to it, while those devices can send data back. The RBPi is ideal for connecting to and controlling physical devices over the internet and that is powerful and exciting thing.

Playing around with the GPIO can be safe and fun, provided you follow some rules and instructions. It is very easy to kill an RBPi if you randomly plug wires and power sources into it – therefore the caution. You could also do a lot of damage if you connect things to your RBPi that use up a lot of power. For example, connecting LEDs to your RBPi is fine, but connecting motors are not. For those newly introduced to the RBPi, using a breakout board such as the Pibrella is a safer alternative than to use the GPIO directly.

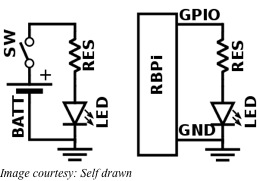
For using the GPIO as an output, the RBPi replaces the power source and a switch in the external circuit. For instance, when an LED is to be lit up, generally a battery is used as a power source and a resistance is necessary to limit the current flow. A switch offers the means to turn the LED on or off. All these are connected in series for the circuit to operate.

To control the LED from an RBPi, you can safely omit the battery and the switch from the circuit. You can individually turn on or off each output pin of the RBPi. Additionally, when the pin is on or digitally HIGH, it outputs +3.3V and when it is off or digitally LOW, it outputs 0V. The next step involves instructing the RBPi when to turn the pin on and when to turn it off.

GPIO inputs on the RBPi require some more work. The RBPi senses an input signal on a pin based on whether there is adequate voltage present. The voltage presented by a sensor must be within levels specified for the RBPi to sense it as digitally HIGH or digitally LOW. Sensing analog or continually varying signals usually needs another interface called ADC or Analog to Digital Converter.

LED myths and truths

led mythsPeople tend to make up myths about things not understood properly. For example, we have been using incandescent bulbs for over 100 years now, and some think they offer the best illumination possible. Studies related to energy consumption and investigations into the spectral light distribution have debunked this myth about incandescent lamps being superior. People are readily moving over to fluorescent types and lately, to LED types for meeting their illumination requirements. However, the fear of the unknown is catching up – myths about LEDs.

As individuals and companies begin to realize that LEDs can help to save money by reducing energy consumption, some people insist that there are problems with LEDs. In reality, LEDs are simply harmless, as we discuss some of the myths associated with them.

Myth 1: LEDs Can Make You Go Blind

Recently, a study conducted on the effects of LED light on human eyes or more specifically, on human retinal cells, was published in an issue of the Journal of Photochemistry and Photobiology. According to the authors, LEDs can harm human eyes. In their experiment, the authors found that human retinal cells were affected if they were exposed to 5mW per cm2 of light from an LED for 12 hours. That is an equivalent exposure to light from a 100W incandescent lamp at a distance of 4-inches for a 12-hour period.

However, light at that intensity and duration will certainly damage anyone’s eyes, irrespective of the source. That is also the reason one must not stare at the sun for any length of time. The lens within the human serves to focus light on to the retina. This is similar to any convex lens focusing the sun’s rays on a black paper causes the paper to start burning. Staring at any intense light source for some time is likely to burn a hole in the retina.

Myth 2: Blue LEDs Are More Dangerous Than Others Are

Again, independent of the light source, bright blue light is not very good for the eyes. Blue light may cause nausea and temporary headaches and long-time exposure could damage the retina permanently.

LED makers often use a primary blue LED and use a special phosphor to down-convert it to produce white light. That has given rise to the myth that blue LEDs are dangerous and they may cause cancer. However, no evidence has been found to substantiate this. Medically, blue light does lower melatonin levels in humans leading to a weakening of the immune system. Again, no link has been found between cancer and immune systems weakened with LED light.

Myth 3: LED Brightness Is Not Enough and the Light Quality Is Questionable

This may have been true at some point of time in the past, but now, LED lights are replacing halogen lamps. LEDs are available with color temperatures ranging from warm white to daylight (2,500K t0 6,500K) and with CRI or Color Rendering Index between 75 and 90. The reference for this measurement is the incandescent bulb, which by definition has a CRI of 100. In comparison, low-pressure sodium vapor lamps have a CRI of -44, mercury vapor lamp’s CRI is 49 and quartz metal halide lamps rate at a CRI of 85.

Are There Any Energy-Saving Fans

are there energy saving fans?While LED lights have brought about a sea of improvement in the efficiency of lighting systems we use every day, we do not hear of similar achievement in the area of fans. Along with inefficient incandescent bulbs, manufacturers have stuck with the same design of the DC or AC fan for a long time. Things are beginning to look up now.

AC motors have two windings, one on the stator and the other on the rotor, which create the magnetic fields that interact with each other. A capacitor provides the initial phase-shift in the magnetic field produced by the stator and this allows the fan to start rotating. Using two windings to create the interacting magnetic fields consumes additional energy, making an AC fan inefficient.

DC fans usually have a permanent magnet for the stator. There is only one winding on the rotor, which creates the magnetic field to interact with the permanent magnetic field of the stator. Unlike the AC motor, additional energy is not required to produce the stator’s magnetic field of a DC motor. That reduces the basic energy consumption of a DC motor by about 30% compared to that consumed by a similarly rated AC motor.

To react with the fixed magnetic field of the stator and induce shaft rotation, the current direction in the rotor of a traditional DC motor is switched using a commutation ring and carbon brushes. Mechanical friction and electrical sparking during commutation is the main cause for lowering the efficiency of traditional DC motors.

Although there have been brushless DC motors present for several years, the need for a separate DC power supply has precluded the prolific use of these higher efficiency motors. Adding a rectifier for using these motors only on AC supplies has proved to be both expensive and complex. Now brushless DC motors are available with integrated electronics that allow fans to be operated directly from the AC mains supply, while simultaneously providing a means of controlling the speed of the fan by regulating the power to the fan motor.

To control the fan motor without loss of accuracy or efficiency, the integrated electronics control has to monitor the motor speed continuously and adjust the control input. As the circuitry is accessible to external control, simple speed control options are possible. For example, sensors that provide 4-20mA or 0-10V/PWM input can easily control the fan speed in a closed loop while responding to temperature, pressure or any other chosen parameter. The fan also supplies the DC voltage for the sensor, so no extra power supply is necessary. As there are no triacs or frequency inverters used, no RFI or whining noises are generated.

When a fan is run any faster than necessary, it wastes a lot of energy. When you double the speed of a fan, the power input to its motor increases by a factor of eight. Therefore, for most efficient use, the speed must match the demand. That makes electronic speed control/modulation a potential candidate for huge energy savings.

Manufacturers design AC fans to operate at a specific point on the motor’s performance curve and this coincides with their peak efficiency. Efficiency of AC motors can drop off drastically when operated on either side of this operating point. Modern brushless DC motors have an almost flat efficiency curve.