Tag Archives: Customer Projects

Make a 9V headlamp head flashlight

Here’s an easy project that simple enough for electronic beginners, plus the supplies required are probably laying around your house or workshop.

Could you buy the same thing for just a few dollars more? Sure you could, but you’d miss out on the satisfaction of assembling this project all by yourself.

Here’s what you need:
2 high intensity white LEDS (you can use other colors if desired)
small perf board
2 470 ohm resistors
toggle switch or slide switch
9V battery snap
9V battery
small project box (you can use an Altoid tin)
electrical wire (about 2′ total)
soldering iron
solder
hot glue
electrical tape

For full assembly instructions, you can view the pages here:
http://www.instructables.com/id/9-Volt-Headlamp/

Book for electronics beginners

If you are new to electronics and want a good book to learn about circuits and electronic components, then I recommend that you check out this book:

Getting Started in Electronics by Forrest M Mims III

I’ve had my copy so long that it is almost time to replace it but even though it is an old, worn out copy, the information is still as good today as it was 15 years ago when I got my book. Of course, there are some things that won’t be found in here, but for the beginner, you can’t go wrong with this book.

The chapters are logically laid out and easy to read and each chapter builds on the previous lessons. I would recommend this book for anyone who wants to learn about electronics – from child to adult.

Introduction to electronics

Introduction to electronics

How to Jailbreak an iPad

Jailbreaking an iPad

If you have an iPad, you may be intrigued by the thought of jailbreaking it.

Jailbreaking a device permits you to install and use third party applications and utility programs. In the case of a jailbroken iPad, you would be able to then run apps like Adobe Flash which is not available through the Apple OS, or access files like you can on a PC. One app that caught my eye was the multitasking app which would allow you to run multiple programs without having to save/close them. Another great app called Wi-Fi Sync gives you the flexibility to sync your iPad with Wi-Fi – no plugged in USB required.

Of course, jailbreaking the iPad is not without risk (the number one concern would be warranty) but PCWorld.com has put together the definitive guide to jailbreaking your iPad. In fact, PCWorld’s guide is so complete, it even gives you instructions on how to revert back should you get cold feet (or have to go back).

Once you’ve hacked your iPad, be sure to avoid the iPad updates from Apple since your device can be reverted to the non-jailbroken state. Should that happen, you can jailbreak your iPad again after the update is installed.

PCWorld – How to Jailbreak an iPad

Make an inexpensive & simple UV LED Torch

UV LEDFrom our friends at instructables comes an easy project for use with UV LEDS.

To make this simple project, here’s what you’ll need:
2 Ultra Violet LEDS
1 1/4W resistors (the value of the resistor needs to be calculated based on the forward voltage of the LED you use)
1 non-working 9V battery (or a 9V battery clip)
1 new 9V battery
Pliers
Solder
Soldering equipment

The full instructions on the Instructables site will show you how to put everything together. Once assembled, the light snaps on to a working 9V battery to function.

Keep in mind, you don’t have to use UV LEDS for this project – you can use any color. Just adjust the resistor required based on the forward voltage and forward current of the LEDS you choose.

Buying LEDS without specs or you don’t remember the specs of the ones you have sitting around? Assume a max of 2.8V – 3V and 20mA. I would think high intensity white LEDS would work really well for this project.

I haven’t put this one together myself yet, but I think a few of these are coming with me on my next camping trip. Nice way to light up the tent and the ‘facilities’ late at night. Fun project – and you probably already have everything you need right on hand.

Rubber Feet : features and applications

Rubber feet have many different features and applications for the home, the workshop or in the manufacturing process. Here are some common features of the rubber bumpers that West Florida Components has on hand:

  • low abrasion
  • superb skid resistance
  • easy to apply – just peel and stick
  • does not stain or mar
  • can absorb shocks and vibrations
  • crack resistant
  • is recognized by UL

You can use adhesive rubber feet in many different applications. Some of the most common are:

Sound dampening and spacers for cabinet doors, drawers and lids

For those purposes, these are some of the suggested self-adhesive rubber bumpers to use:

Medium clear cylindrical (round) rubber feet

Small clear cylindrical rubber feet

Medium black hemispherical rubber feet

Small black hemispherical rubber feet

Small clear hemispherical rubber feet

As feet on the bottom of household appliances, office equipment, telephones, scales, clocks, speakers, computers, and other devices

Medium black cylindrical (round) rubber feet

Medium clear hemispherical rubber feet

Large black hemispherical rubber feet

Medium clear square rubber feet

For the back of picture frames and hung mirrors

Medium clear square rubber feet

Medium black square rubber feet

Large black square rubber feet

Turn your old PC fans into mini wind generators

pc fanHere’s a great project that you can do either to experiment with wind turbines or to generate some energy! While the amount of energy produced is not overwhelming, this project can sure get your brain moving in the right direction.

The best thing about this project is that you probably already have everything you need lying around:

  • Thick plastic bottle
  • Old PC fan, bigger the better!
  • A few feet of small wire
  • A piece of wood about 1.5″ square and around 20cm long
  • Two lengths of steel tubing that slide inside of each other, about 1/2″
  • 6 Schottkey diodes
  • Epoxy
  • Super Glue
  • Zip ties
  • An old CD

You can find the full instructions including video here: http://www.instructables.com/id/Upcycle-your-old-PC-fans-into-mini-wind-generators/

If you want to have a kid-friendly wind turbine kit that already has all the pieces you need, we sell one of those. Our kits come with full instructions and all the materials needed to try your hand at creating a source of renewable energy – a wind turbine. The kit also comes with different experiments you can try with your wind turbine once it’s assembled. Great project for summer for the kids!

What is a wind turbine?

A wind turbine is a rotary device that draws energy from the wind. This is different from a windmill, which draws energy from the wind but that energy is directly converted into mechanical energy used by some sort of machinery. Wind turbines are converted into raw electricity.

There are two main types, horizontal and vertical axis, of which the horizontal axis is more common. What are the differences between these two? Horizontal-axis turbines have the main rotor shaft and generator at the top of the tower. Horizontal axes must be pointed into the wind in order for them to work properly. However, the structure of the blades facing the wind also gives them a great angle of attack, which is the angle at which they have contact with the wind. This insures that the blades will be very efficient when converting wind to energy. Vertical-axis turbines are basically the same, except the axis is vertical, and they have the advantage of not having to face the wind.

Wind turbines are made up of three main components, the rotor component, generator component, and structural support component. The rotor component makes up about 20% of the cost, and consists of the blades. The generator component makes up 34% of the cost, and consists of the electrical generator, the control electronics, and usually a gearbox component for converting the low speed incoming rotation to high speed rotation which is better for generating electricity. Finally the structural support component makes up about 15% of the cost and consists of tower and rotor yaw mechanism.

Installing wind turbines can be a great way to save money on your electrical bills and create your own energy. They can be bought pretty inexpensively or you can even build your own and get the supplies to do it for even cheaper. If you are interested in building a basic wind turbine to see how it works, you should buy an educational wind turbine kit to get you started.

Make a coin battery – great electronics project for kids!

What better way to illustrate how to build a basic electronic connection than to use coins to build a battery?

Here’s what you need:

Quarter

Quarter

quarters or dimes
aluminum foil
blotter paper (see below)
salt
cider vinegar
wire (short length of both black and red wire – ~16 gauge)
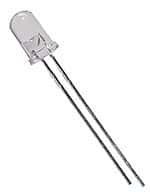
1 LED (any through hole LED)
scissors
pen or marker
voltmeter (optional)

~~~~~~~~~~~~~~~~~~~~~~~~~~~~~~~

Trace the coins on the aluminum foil and blotter paper. Cut out 10 of each so that you have 10 circles of aluminum foil and 10 circles of blotter paper.

(Blotter paper can be found in the art store or the art section of your local craft store. You can also find blotter paper in the cosmetics department. If you can’t locate blotter paper, then you can also try using thick paper towels.)

Mix a small amount (1/4 cup) of vinegar with some salt. Stir the salt until dissolved. If the salt can not dissolve, then you’ve added too much. Add some additional vinegar and stir. Soak the circles of blotter paper in the vinegar and salt mixture.

Stack the foil, blotter paper and coins as shown in the video. It is important that the foil not touch the other layers. Let the ‘battery’ stand for about 15 minutes to develop a charge.

Connect each lead of the LED to a short piece of wire; the black wire connects to the negative lead and the red wire is attached to the positive lead on the LED. Place the exposed end of negative wire on the bottom of the ‘battery’ touching the foil, and the end of the positive wire to the quarter on top of the stack.

Optional: Use the voltmeter to measure how many volts are generated by the battery. A battery with 6 or more cells should be able to light up a standard LED with no problem!

Converting dimensions from fractions to metric to decimal

We Americans are so used to seeing decimals or fractions for measurements that it’s not been easy for us to adapt to the metric system. Unfortunately, the industry standard sizes of most electronic components are provided in datasheets and descriptions as metric equivalents.

Need to convert a fraction or decimal to the metric system easily? Here is a decimal to fraction to millimeter conversion chart that will make that task easy for you. If you want to convert a number more precisely, use this link to jump to an online metric conversion calculator.

Of course, you can just use standard fractions, but it’s hard to find a T1 3/4 LED when you’re looking for it as a 0.19685 inches LED.

Screw-on rubber feet – newly expanded product line!

recessed bumpersWe’re listening! You requested a bigger selection, we got them! West Florida Components has now expanded their line of recessed bumpers. Recessed bumpers are also known as screw-on rubber feet and cabinet feet.

The rubber feet can be used in a variety of applications from electronic equipment to woodworking or carpentry and furniture. Where ever you require a rubber foot with a screw, these new rubber feet can be used. Check the specs on each foot for the sizes, recommended screw size and weight rating for each foot.

West Florida Components now carries 11 different sizes and shapes – including the popular square feet and the traditional round feet. Both shapes accept different screw sizes and rivets because of the plated steel support bushings included in the recessed area of each foot.

All the cabinet feet are manufactured from thermoplastic rubber which provides excellent shock absorbingsquare cabinet feet qualities and traction as well as being a non-marking material. Thermoplastic rubber is traditionally molded from Monsanto Santoprene®. Santoprene® is a thermoplastic rubber designed to offer chemical resistance equivalent to neoprene and is resistant to a wide variety of solvents and chemicals.